Console Output and Serial Terminals
Overview
This page describes different methods for setting up a serial console post booting up an NST system. See Getting Started - Server Boot for setting up a serial console initially during a NST Live boot.
Serial Devices
Enabling More Than 4 Serial Devices
By default, the Linux kernel that comes with Fedora (and hence the NST) enables 4 serial devices (/dev/ttyS0, /dev/ttyS1, /dev/ttyS2 and /dev/ttyS3). If your hardware has more than 4 total serial devices, you will want to add the "8250.nr_uarts=COUNT" parameter to your boot options in /boot/grub/grub.conf.
For example, a system with one serial port on the motherboard and eight serial ports on a SeaLevel PCI adapter would have a total of nine serial ports available. In order to get access to all of the available serial ports on this system, the following parameter was added to the kernel parameters line in /boot/grub/grub.conf:
8250.nr_uarts=9
Determine Availability and Mapping
The /proc/tty/driver/serial file can be invaluable when trying to determine which physical serial port maps to which device entry. For example, on a system with one serial port on the motherboard and eight serial ports on a SeaLevel PCI adapter, /proc//tty/driver/serial reported the following:
serinfo:1.0 driver revision:
0: uart:16550A port:000003F8 irq:4 tx:0 rx:0
1: uart:16550A port:0000C828 irq:16 tx:226 rx:42 brk:1 RTS|CTS|DTR|DSR
2: uart:16550A port:0000C830 irq:16 tx:31 rx:0 RTS|DTR
3: uart:16550A port:0000C838 irq:16 tx:24 rx:0
4: uart:16550A port:0000C800 irq:16 tx:24 rx:0
5: uart:16550A port:0000C808 irq:16 tx:24 rx:0
6: uart:16550A port:0000C810 irq:16 tx:24 rx:0
7: uart:16550A port:0000C818 irq:16 tx:24 rx:0
8: uart:16550A port:0000C820 irq:16 tx:1718 rx:0 RTS|DTR
[root@probe ~]#
The above output provides clues that /dev/ttyS0 mapped to the serial port on the motherboard (which is what you would expect). However, the other port addresses indicated that the eight serial ports on the SeaLevel PCI adapter did not map out as you would expect. The first physical port on the SeaLevel PCI adapter mapped to /dev/ttyS4. The clue here was that ports on the SeaLevel adapter started at port 0xC800 (as shown by the lspci output below). Why the sixth port on the PCI adapter (at port 0xC828) mapped to /dev/ttyS1 is a mystery, but at least the output above helped to sort out the mapping.
01:05.0 Serial controller: Sealevel Systems Inc Eight Port RS-232 Interface (rev 01) (prog-if 02 [16550])
	Subsystem: Sealevel Systems Inc Eight Port RS-232 Interface
	Flags: medium devsel, IRQ 16
	Memory at effff000 (32-bit, non-prefetchable) [size=128]
	I/O ports at cc00 [size=128]
	I/O ports at c800 [size=64]
	Kernel driver in use: serial

[root@probe ~]#
Serial Terminal On NST 2.13.0
Add Serial Console On Device: /dev/ttyS0
Use the following command to manually enable the serial console on NST versions 2.13.0 using upstart. This example will set the serial baud rate to: "57600" and use serial device: "/dev/ttyS0".
[root@probe ~]#
A user login prompt should now be active on serial device: "/dev/ttyS0".
Serial Terminal On NST 2.15.0 or Above
Add A Serial Terminal On Device: /dev/ttyS0
![]() See the topic: "Enabling systemctl Bash Completion" for making it quick and easy to complete the systemctl command.
See the topic: "Enabling systemctl Bash Completion" for making it quick and easy to complete the systemctl command.
Use the following command to manually enable a serial terminal on NST versions 2.15.x or above using systemd. This example will use the current baud rate (agetty -s option) set typically during a boot time and use serial device: "/dev/ttyS0". If one needs to adjust the baud rate, send a break character on your communications application to cycle through the baud rate list (i.e., In this example: 115200, 38400 and 9600).
[root@probe ~]#
A user login prompt should now be active on serial device: "/dev/ttyS0". To get status use the systemctl command as follows:
serial-getty@ttyS0.service - Serial Getty on ttyS0
          Loaded: loaded (/lib/systemd/system/serial-getty@.service)
          Active: active (running) since Tue, 17 May 2011 16:59:56 -0400; 5min ago
        Main PID: 31524 (agetty)
          CGroup: name=systemd:/system/serial-getty@.service/ttyS0
                  └ 31524 /sbin/agetty -s ttyS0 115200 38400 9600
[root@probe ~]#
Add An Additional Serial Login Device: /dev/ttyUSB0
One can add an additional Serial user login session on a serial device. If your NST system does not have a physical serial port, you can plugin a USB To Serial Converter device for user login. In this example we are adding a USB To Serial Converter which attaches as device: "ttyUSB0". Simply start a serial login on this device as follows:
[root@probe ~]#
A user login prompt should now be active on serial device: "/dev/ttyUSB0". To status for this device use the systemctl command as follows:
serial-getty@ttyUSB0.service - Serial Getty on ttyUSB0
	  Loaded: loaded (/lib/systemd/system/serial-getty@.service)
	  Active: active (running) since Fri, 20 May 2011 21:13:55 -0400; 3min 24s ago
	Main PID: 1273 (agetty)
	  CGroup: name=systemd:/system/serial-getty@.service/ttyUSB0
		  └ 1273 /sbin/agetty -s ttyUSB0 115200 38400 9600
[root@probe ~]#
To make this configuration permanent add the following:
[root@probe ~]#
Steps To Add A Custom Serial Login Device: "/dev/ttyS1"
Use the following procedure to add a custom serial login device under systemd control. In this example we will add the ability for user login on the second serial device: "/dev/ttyS1" using a fixed baud rate of 57600 and 8-bits clean with no flow control.
1. Get a copy of "/lib/systemd/system/serial-getty@.service" and place it in directory: "/etc/systemd/system" and give it a custom name (e.g., "serial-getty-fterm@.service").
total 32
drwxr-xr-x. 7 root root 4096 May 22 20:30 .
drwxr-xr-x. 4 root root 4096 May 15 19:22 ..
lrwxrwxrwx  1 root root   36 May 16 09:26 default.target -> /lib/systemd/system/runlevel5.target
drwxr-xr-x. 2 root root 4096 May 15 19:13 default.target.wants
drwxr-xr-x. 2 root root 4096 May 22 20:26 getty.target.wants
drwxr-xr-x. 2 root root 4096 May 15 19:26 graphical.target.wants
drwxr-xr-x. 2 root root 4096 May 16 09:26 multi-user.target.wants
-rw-r--r--  1 root root  903 May 22 16:36 serial-getty-fterm@.service
drwxr-xr-x. 2 root root 4096 May 15 19:13 sysinit.target.wants
[root@probe ~]#
2. Edit custom file (Using 57600 baud): "/etc/systemd/system/serial-getty-fterm@.service" and set the fixed baud rate of 57600 on the "ExecStart" line.
#  This file is part of systemd.
#
#  systemd is free software; you can redistribute it and/or modify it
#  under the terms of the GNU General Public License as published by
#  the Free Software Foundation; either version 2 of the License, or
#  (at your option) any later version.

[Unit]
Description=Serial Getty on %I
BindTo=dev-%i.device
After=dev-%i.device systemd-user-sessions.service plymouth-quit-wait.service
After=rc-local.service

# If additional gettys are spawned during boot then we should make
# sure that this is synchronized before getty.target, even though
# getty.target didn't actually pull it in.
Before=getty.target

[Service]
Environment=TERM=vt100
ExecStart=-/sbin/agetty %I 57600
Restart=always
RestartSec=0
UtmpIdentifier=%I
KillMode=process

# Some login implementations ignore SIGTERM, so we send SIGHUP
# instead, to ensure that login terminates cleanly.
KillSignal=SIGHUP
2. Edit custom file (Using 115200 baud): "/etc/systemd/system/serial-getty-fterm@.service" and set the fixed baud rate of 115200 on the "ExecStart" line.
#  This file is part of systemd.
#
#  systemd is free software; you can redistribute it and/or modify it
#  under the terms of the GNU General Public License as published by
#  the Free Software Foundation; either version 2 of the License, or
#  (at your option) any later version.

[Unit]
Description=Serial Getty on %I
BindTo=dev-%i.device
After=dev-%i.device systemd-user-sessions.service plymouth-quit-wait.service
After=rc-local.service

# If additional gettys are spawned during boot then we should make
# sure that this is synchronized before getty.target, even though
# getty.target didn't actually pull it in.
Before=getty.target

[Service]
Environment=TERM=vt100
ExecStart=-/sbin/agetty %I 115200
Restart=always
RestartSec=0
UtmpIdentifier=%I
KillMode=process

# Some login implementations ignore SIGTERM, so we send SIGHUP
# instead, to ensure that login terminates cleanly.
KillSignal=SIGHUP
3. Create a symbolic link in directory: "/etc/systemd/system" using serial device: "/dev/ttyS1" to custom file: "/etc/systemd/system/serial-getty-fterm@.service". This will make the configuration permanent across reboots.
drwxr-xr-x. 2 root root 4096 May 22 20:26 .
drwxr-xr-x. 7 root root 4096 May 22 20:25 ..
lrwxrwxrwx. 1 root root   34 May 15 19:13 getty@tty1.service -> /lib/systemd/system/getty@.service
lrwxrwxrwx. 1 root root   34 May 15 19:13 getty@tty2.service -> /lib/systemd/system/getty@.service
lrwxrwxrwx. 1 root root   34 May 15 19:13 getty@tty3.service -> /lib/systemd/system/getty@.service
lrwxrwxrwx. 1 root root   34 May 15 19:13 getty@tty4.service -> /lib/systemd/system/getty@.service
lrwxrwxrwx. 1 root root   34 May 15 19:13 getty@tty5.service -> /lib/systemd/system/getty@.service
lrwxrwxrwx. 1 root root   34 May 15 19:13 getty@tty6.service -> /lib/systemd/system/getty@.service
lrwxrwxrwx  1 root root   47 May 22 20:26 serial-getty-fterm@ttyS1.service -> /etc/systemd/system/serial-getty-fterm@.service
lrwxrwxrwx  1 root root   41 May 20 21:12 serial-getty@ttyUSB0.service -> /lib/systemd/system/serial-getty@.service
[root@probe ~]#
4. Manually control systemd using systemctl to startup the login service via agetty on device: "/dev/ttyS1". systemd will do this automatically during the boot process.
[root@probe ~]#
5. Check the current service status for serial login on device: "/dev/ttyS1"
serial-getty@ttyS1.service - Serial Getty on ttyS1
	  Loaded: loaded (/etc/systemd/system/serial-getty-fterm@.service)
	  Active: active (running) since Sun, 22 May 2011 20:09:39 -0400; 8s ago
	Main PID: 6408 (agetty)
	  CGroup: name=systemd:/system/serial-getty-fterm@.service/ttyS1
		  └ 6408 /sbin/agetty ttyS1 57600
[root@probe ~]#
The ModemManager May Interfere With A USB Serial Port Adapter
![]() The NetworkManager application uses the ModemManager plugin. If you have NetworkManager running and are using the minicom terminal emulation program with a USB serial port adapter, then you may experience garbage characters being sent to the USB serial port. These characters are generated from the ModemManager application and may prove to be undesirable. One solution to resolve this issue is to disable the startup of the ModemManager application via the NetworkManager. This can be accomplished with the following:
The NetworkManager application uses the ModemManager plugin. If you have NetworkManager running and are using the minicom terminal emulation program with a USB serial port adapter, then you may experience garbage characters being sent to the USB serial port. These characters are generated from the ModemManager application and may prove to be undesirable. One solution to resolve this issue is to disable the startup of the ModemManager application via the NetworkManager. This can be accomplished with the following:
[root@probe ~]#
Now reboot your NST system:
Serial Console In Virtual Environments
Serial Console: VMware Workstation (Linux)
This section will describe the steps needed to attach a serial device to an NST Virtual Machine (VM) under VMware Workstation (v7.1.x or greater) control for serial console output. This will allow one to examine the complete boot sequence via the serial console output including boot strapping the Linux Kernel. See the article: Using the VMware Workstation emulated serial port on a Linux host for advanced usage (i.e., Howto setup a Linux Kernel serial debugger) of the serial console under VMware Workstation control. In this example we will add a Unix Socket connection serial type and use the nc (netcat) utility for attachment to the socket (I/O) in a Gnome Terminal. Alternatively, one could use the minicom terminal emulation program and set the serial device to point to a Unix socket (e.g., "unix#/tmp/nstcom2").
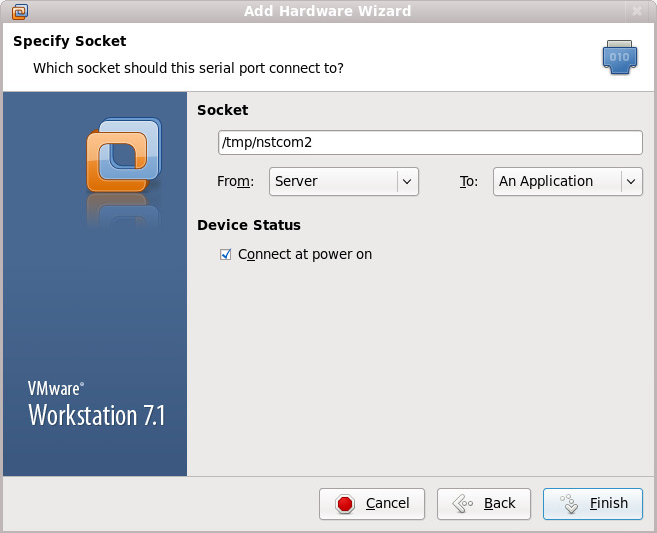
1. To add a serial port to an NST VM, using the following menu sequence on VMware Workstation: VM => Settings => Add => Serial Port => Next => Output to socket. In this example we are adding the Device: "Serial Port 2" (Linux serial device: /dev/ttyS1) with Unix socket name: "/tmp/nstcom2". See the screenshots below:
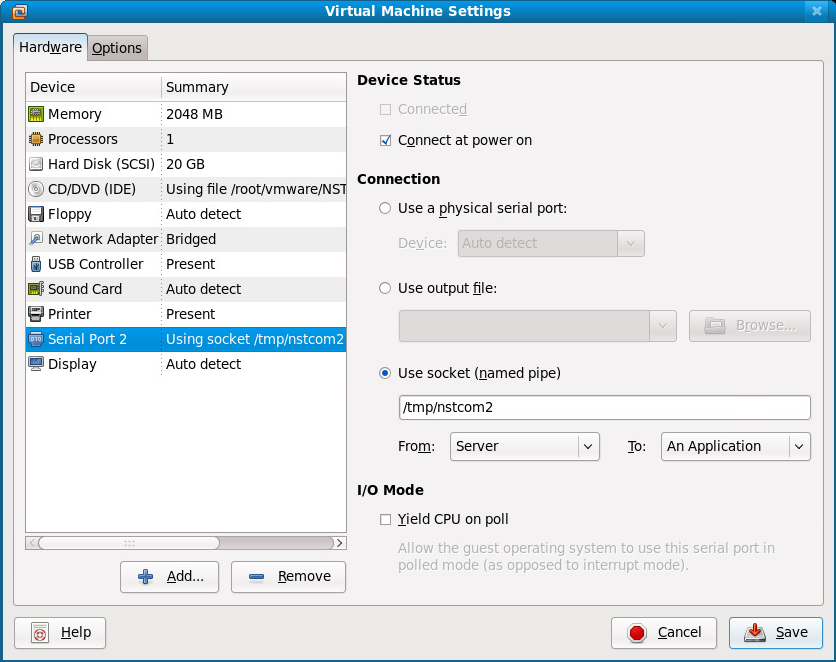
The serial port setting for VMware Workstation after adding the Device: "Serial Port 2" with Unix socket name: "/tmp/nstcom2" will be shown as:
2. The Unix socket: "/tmp/nstcom2" will not be created until the VM is started by VMware Workstation. Therefore, in order to see the entire serial console output, start the VM with "Power On to BIOS" (Menu Sequence: VM => Power => Power On to BIOS). Once in the BIOS, the socket will be created.
3. Now on your Linux host system, startup a Gnome Terminal. Make sure you edit the "Profile Preferences" set the Scrollback to "unlimited" to capture all serial console output.
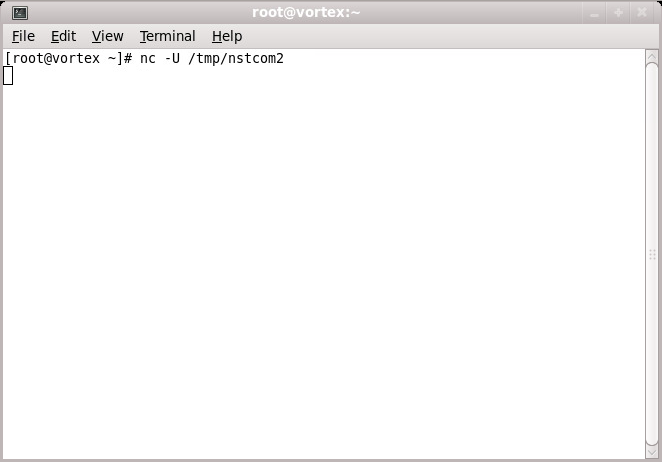
4. Start the nc utility to use: "UNIX-domain sockets" and attach it to the socket created by VMware Workstation (i.e. nc -U /tmp/nstcom2).
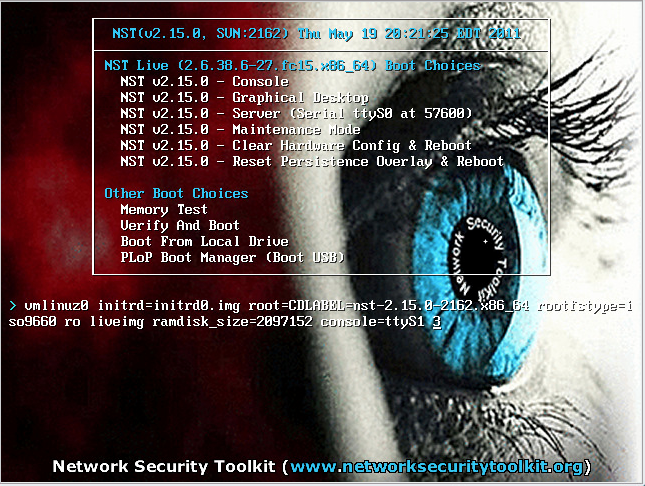
5. Now back on the NST VM, exit from the BIOS setup menu to either the NST Live SYSLINUX menu or the NST GNU GRUB boot menu. Select a boot choice and add the kernel parameter: "console=ttyS1" to it. Use the <tab> key for editing an NST Live menu boot choice or use the 'e' key to edit an NST GNU GRUB choice. Below is a screenshot for editing the NST Live boot choice: "NST v2.15.0 - Console".
6. Now continue booting your NST VM and serial output should be directed to the Gnome Terminal. Since this is a serial console one can also log into NST after the VM has booted.
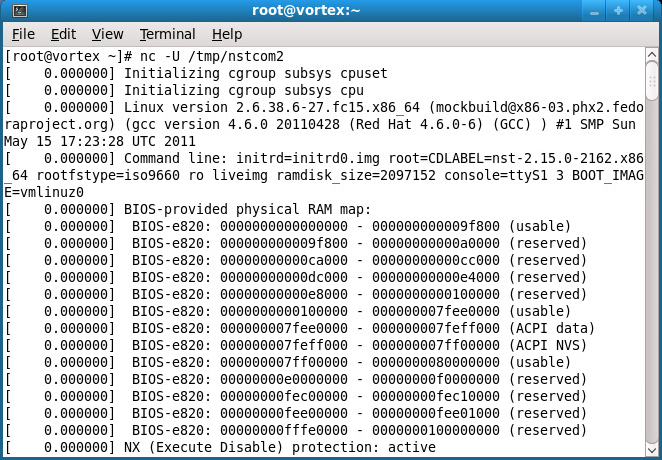
7. One can list the attached serial console devices using the following.
ttyS1                -W- (EC p a)    4:65
[root@probe ~]#
Serial Console: VMware Workstation (Windows)
This section will describe the steps needed to attach a serial device to an NST Virtual Machine (VM) under VMware Workstation (v15.5.x or greater) control for serial console output. We will use the Putty application with a Named Pipe connection type.
- Added a Serial Port to the NST VM and configure with a named pipe connection type using the Windows named pipe naming convention: "\\.\pipe\<Unique Pipe Name>"
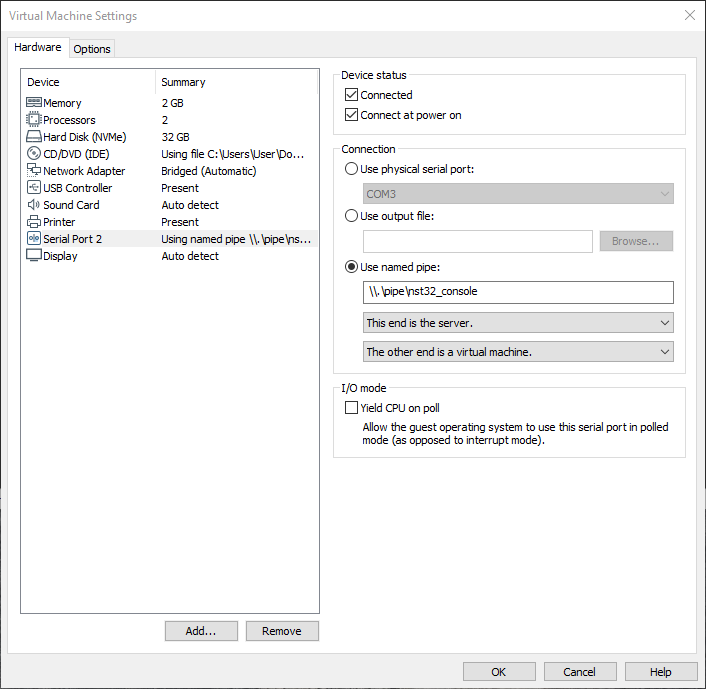
PS C:\Users\User> [System.IO.Directory]::GetFiles("\\.\pipe\")
\\.\pipe\InitShutdown
.
.
.
\\.\pipe\nst32_console
- Next configure a Putty serial session with the corresponding named pipe connection type named used above (i.e., "\\.\pipe\nst32_console"). Typically the serial baud rate should be set to: "115200".
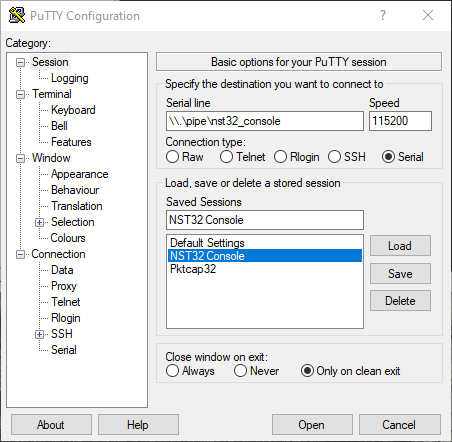
- Next configure serial options in the NST Grub2 file: "/etc/nst/grub2/nst_grub2_defaults" to allow for a Grub2 Serial Console and Server Login Console using "agetty".
Example: Serial options section to enable a Grub2 Serial Console (*Note: --unit is set to "1" - The virtual serial port added by VMware Workstation):
.
.
.
# Uncomment For A NST Grub Serial Console
# --------- --- - --- ---- ------ -------
GRUB_SERIAL_COMMAND="serial --unit=1 --speed=115200 --word=8 --parity=no --stop=1";
GRUB_TERMINAL_INPUT="serial console";
GRUB_TERMINAL_OUTPUT="serial console";
.
.
.
Example: Serial options section to enable a Server Login Console Boot entry (*Note: NST_SERIAL_DEV[idx] is set to "/dev/ttyS1" - The virtual serial port added by VMware Workstation):
.
.
.
#
# NST Server Console Boot
# --- ------ ------- ----
NST_SERIAL[idx]="true";
NST_SERIAL_DEV[idx]="ttyS1";
NST_SERIAL_BAUD[idx]="115200";
NST_TITLE[idx]="Server (Serial ${NST_SERIAL_DEV[idx]} at ${NST_SERIAL_BAUD[idx]})";
NST_GRUB_CMDLINE_LINUX[idx]="audit=0 systemd.unit=multi-user.target";
NST_GRUB_SAVEDEFAULT[idx]="true";
NST_GRAPHICAL_BOOT[idx]="false";
idx=idx+1;
.
.
.
- Finally rebuild the NST Grub2 boot entries using "nstboot" and then reboot. Open up your Putty session for the serial console session.
[root@NST32 ~]# nstboot -v --grub2;
+ BEGIN   + Rebuilding the 'Grub2' configuration file: "/boot/grub2/grub.cfg"

Check/Adding NST Boot Grub2 Defaults file: "/etc/nst/grub2/nst_grub2_defaults"
===============================================================================
Already included...

Generating the NST Grub2 Configuration file: "/boot/grub2/grub.cfg"
===============================================================================
/sbin/grub2-mkconfig --output="/boot/grub2/grub.cfg";
Generating grub configuration file ...
[15133.188809] JFS: nTxBlock = 8192, nTxLock = 65536
[15133.280272] raid6: skip pq benchmark and using algorithm avx2x4
[15133.283570] raid6: using avx2x2 recovery algorithm
[15133.298083] xor: automatically using best checksumming function   avx
[15133.402637] Btrfs loaded, crc32c=crc32c-intel
Found linux image: /boot/vmlinuz-5.6.18-300.fc32.x86_64
Found initrd image: /boot/initramfs-5.6.18-300.fc32.x86_64.img
done

+ END     + Successfully ran the 'Grub2' configuration rebuild
[root@NST32 ~]#
[root@NST32 ~]# systemctl reboot;
Serial Console: Oracle VirtualBox
This section will describe the steps needed to attach a serial device to an NST Virtual Machine (VM) under Oracle VirtualBox (v4.0.8) control for serial console output. This will allow one to examine the complete boot sequence via the serial console output including boot strapping the Linux Kernel. In this example we will:
- Enable a virtual serial port.
- Set the virtual serial port mode to Host Pipe.
- Use the nc (netcat) utility running in a Gnome Terminal to monitor virtual serial output from the NST booted within VirtualBox.
To add a serial port to an NST VM in VirtualBox:
- Select your virtual machine and then click on the Settings icon.
- From the settings panel, select Serial Ports on the left side and then select the Port 1 tab.
- Fill in the Port 1 settings as shown in the screen shot below:
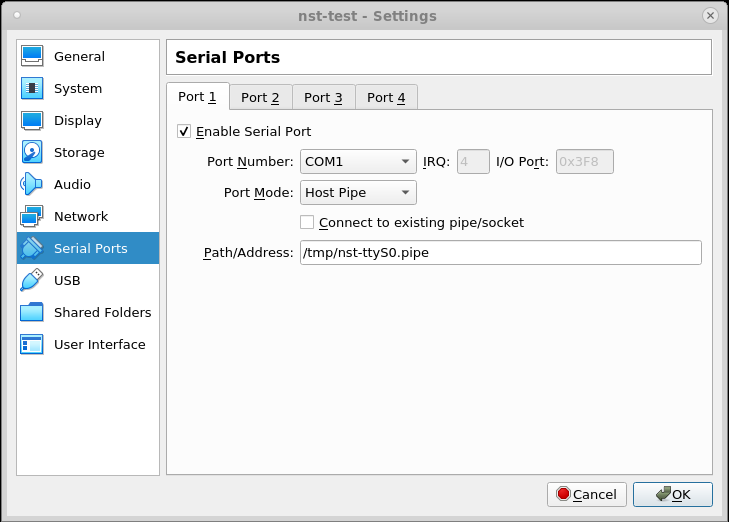
The Unix pipe: "/tmp/nst-ttyS0.pipe" will be created when the virtual machine is started (not before). So, the trick to capture everything is to be ready to start the nc command in a gnome-terminal when the virtual machine goes through its initial BIOS routines.
- Open a gnome-terminal.
- Type in the following command, but do not hit Enter - just get the command ready to run.
nc -U /tmp/nst-ttyS0.pipe
- Power on your virtual machine and as soon as you see the BIOS screen, press the Enter key in your gnome-terminal to start the nc command.
- Click back on the virtual machine window and use the down arrow key to select the Server boot mode.
- If things go according to plan, your two windows should resemble the following:
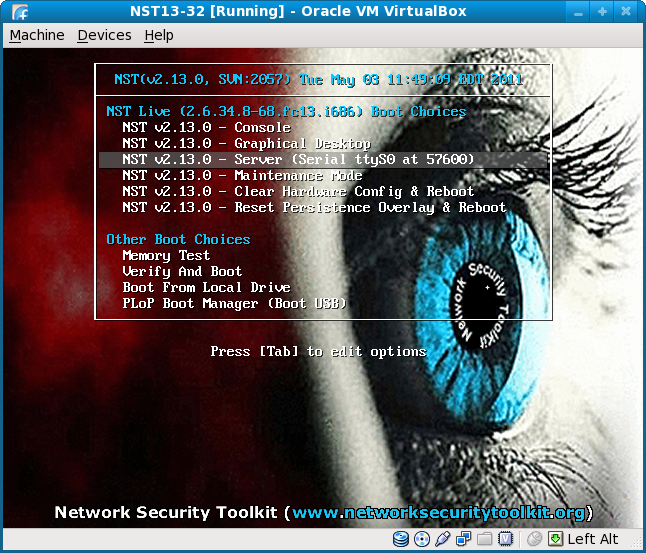
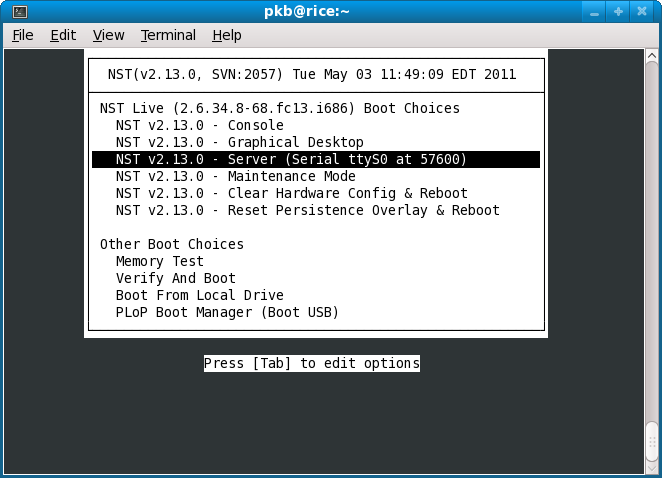
At this point, you can press the Enter key in the VirtualBox window to start the boot process. You should see the entire boot log appear in your gnome-terminal where the nc command is running.
Grabbing the Console With an xterm
To grab console output using an xterm, start up an xterm terminal with the -C option:
xterm -C &
NOTE: This appears to grab all console output (any other devices you originally had configured to capture console output may no longer do so).
Logging in as the 'root' User on a Specific Device
In order to login as user: 'root' on a specific device, make sure that the device is listed in the "/etc/securetty" file. The "/etc/securetty" file is read by the login program: "/bin/login". Its format is a list of the tty devices names allowed, and for all others that are commented out or do not appear in this file, 'root' login is disallowed. For example, to login as user: 'root' on USB serial device: "ttyUSB0" make sure it is added to the "/etc/securetty" file. See the example content below for file: "/etc/securetty":
console
vc/1
vc/2
vc/3
vc/4
vc/5
vc/6
vc/7
vc/8
vc/9
vc/10
vc/11
tty1
tty2
tty3
tty4
tty5
tty6
tty7
tty8
tty9
tty10
tty11
ttyUSB0
Minicom Setup for NST Serial Console Login
Overview
This setup uses a USB Prolific Technology, Inc. PL2303 Serial Port Adapter attached as device: "/dev/ttyUSB0".
Minicom Configuration File
[root@dell1564 ~]# cat /etc/minirc.ttyUSB0;
#
# NST Serial Login Console
pu port             /dev/ttyUSB0
pu baudrate         115200
pu bits             8
pu parity           N
pu stopbits         1
pu rtscts           No
pu xonxoff          No
#
# Disable modem initialization values...
pu minit
pu mreset
pu mdialpre
pu mdialsuf
pu mdialpre2
pu mdialsuf2
pu mdialpre3
pu mdialsuf3
pu mhangup
pu mdialcan
[root@dell1564 ~]#
Minicom Command Line =
[root@dell1564 ~]# minicom -w -c on -t xterm ttyUSB0;