HowTo Setup The NST System With A GPS (gpsd)
Why Connect A GPS?
The primary reason you would connect a GPS to a NST system is to geolocate systems based on WIFI transmissions.
- You connect a GPS to your NST system.
- You run the kismet process which will scan for systems using WIFI communications.
- You then view the locations of discovered WIFI systems in Google Earth.
This page provides information on getting a GPS properly connected to a NST system. For details on using kismet after you have your GPS connected, see: "HowTo Geolocate kismet Data".
Selecting GPS Hardware
It can be tricky in selecting GPS hardware that will be compatible with your NST system. Basically, you want to look for:
- GPS hardware which can put out the NMEA data such as the v2.1 GSA format.
- The necessary hardware and drivers to physically connect the GPS hardware to your NST system.
The Compatible GPSes list at the web site is probably a good place to start. However, GPS models change so frequently, you may find yourself searching for reader comments and feedback at on-line stores.
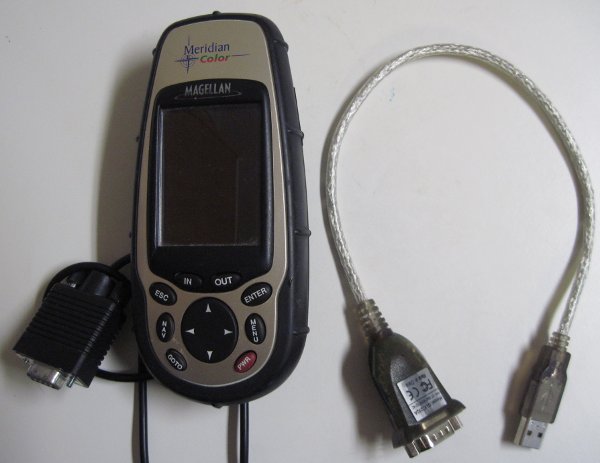
Here is a photo of a Magellan Meridian Color GPS with its RS-232 adapter and a serial to USB adapter which are known to work:

Unfortunately, the serial to USB adapter was purchased a long time ago (probably from http://www.cyberguys.com/). The only labeling on the serial to USB adapter shown above is a model number of GUC232.
Testing GPS Connection
Connecting a Serial GPS
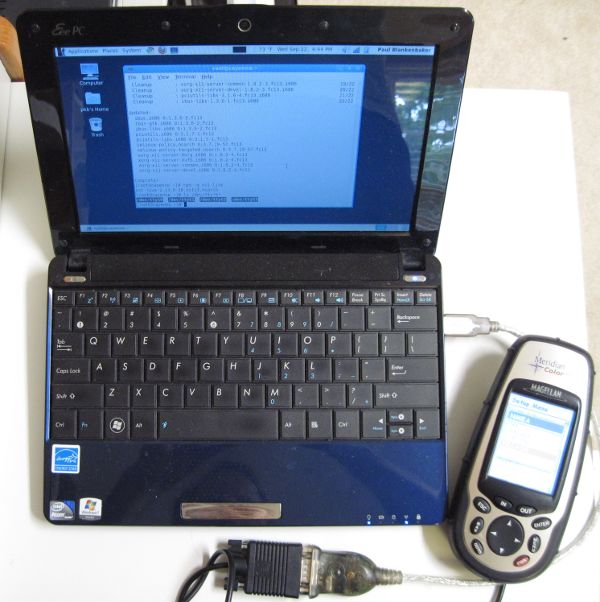
Connecting and configuring your GPS hardware will vary based on your situation. The photo below shows a ASUS Eeee PC running NST v2.13.0. The Magellan Meridian Color GPS is then plugged into a serial to USB adapter which is then plugged into the ASUS Eeee PC.

Configuring the GPS
You will need to configure your GPS device such that it sends data to your NST system. For the Magellan Meridian Color GPS, I needed to go through the setup panel, locate the NMEA menu and enable the v2.1 GSA output.
Listing Serial Devices
The following command is useful in quickly showing what serial devices have been identified by the NST system:
[root@cayenne ~]# ls -l /dev/tty*S*
crw-rw---- 1 root dialout   4, 64 Sep 21 13:12 /dev/ttyS0
crw-rw---- 1 root dialout   4, 65 Sep 21 13:12 /dev/ttyS1
crw-rw---- 1 root dialout   4, 66 Sep 21 13:12 /dev/ttyS2
crw-rw---- 1 root dialout   4, 67 Sep 21 13:12 /dev/ttyS3
crw-rw---- 1 root dialout 188,  0 Sep 22 16:43 /dev/ttyUSB0
[root@cayenne ~]#
The /dev/ttyUSB0 adapter entry tells me that there is only one serial to USB adapter plugged into the system. The other entries (/dev/ttyS0 - /dev/ttyS3) indicate standard serial port entries. However, the ASUS Eeee PC does not have any physical serial ports which the GPS can be connected to, so I know that these serial entries are not being used by my GPS.
Using gtkterm to View GPS Data
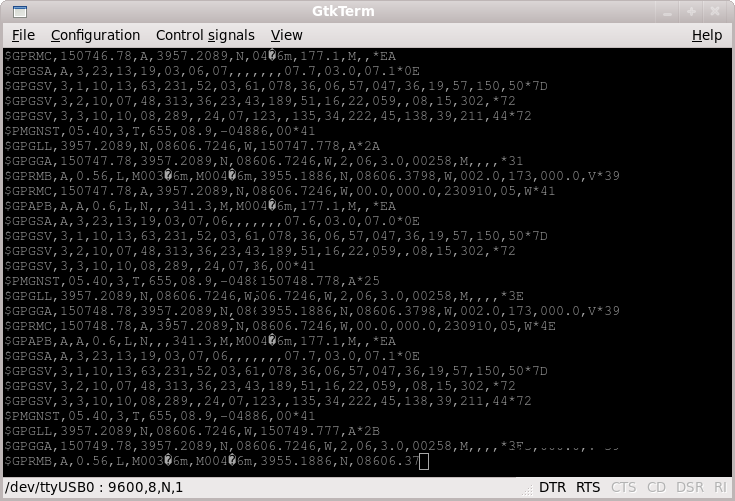
You can use the gtkterm utility to verify that the GPS is sending data to the NST system. You can launch this utility from the command line as shown below (you will need to run this as root or a user which belongs to the dialout group):
[root@cayenne ~]# gtkterm &
[root@cayenne ~]#
After launching the gtkterm application, you will need to open up the Configuration menu and specify the port settings. Again, this will vary based on your GPS. In the situation shown in the image below, the serial connection was set to 9600 baud, 8 data bits, no parity, and 1 stop bit. If 9600 baud doesn't work for you, try 4800 baud or check the settings of your GPS.

Setting Up gpsd
Once you've completed the above steps and know that your GPS is sending data to your NST system, you can then setup the [1] daemon. The gpsd service is used to provide location information to other processes (like kismet).
Editing: /etc/sysconfig/gpsd
The first step in setting up the gpsd service is to edit its configuration file. Most likely you will only need to change the serial device which your GPS is connected to.
Here is the configuration I use for the Magellan Meridian Color GPS and serial to USB adapter hardware which I have:
OPTIONS="-n"
DEVICE="/dev/ttyUSB0"
See the man page for the gpsd process for additional configuration options.
Starting The gpsd Service
Once you've updated the gpsd configuration file, you can start the gpsd service using the following command:
[root@cayenne ~]# service gpsd start
Starting gpsd:                                             [  OK  ]
[root@cayenne ~]#
Testing gpsd Configuration
After starting the gpsd service, you should verify that it is functioning.
Using lsof
You can use the lsof command to make sure that the gpsd command is listening for TCP connections. For example:
[root@cayenne ~]# lsof -i :2947
COMMAND  PID   USER   FD   TYPE DEVICE SIZE/OFF NODE NAME
gpsd    3501 nobody    4u  IPv4 213907      0t0  TCP localhost.localdomain:gpsd (LISTEN)
[root@cayenne ~]#
The output above tells us that the gpsd process is listening for connections on port 2947. It should also be noted that it is only accepting connections from the localhost (127.0.0.1).
Using telnet
We can telnet to the gpsd service and press the o key several times to get some information back from the gpsd service. To exit from the telnet connection, we will press Control-[ and then enter the word close.
[root@cayenne ~]# telnet 127.0.0.1 2947
Trying 127.0.0.1...
Connected to 127.0.0.1.
Escape character is '^]'.
GPSD
GPSD,O=?
GPSD,O=GSV 1285257413.870 0.005 39.953486667 -86.112073333 254.000 36.000 20.700 0.0000 0.000 0.000 ? 24001.74 ? 3
GPSD,O=GSV 1285257415.850 0.005 39.953486667 -86.112073333 254.000 31.500 18.975 0.0000 0.000 0.000 ? 64.09 ? 3

telnet> close
Connection closed.
[root@cayenne ~]#
Using xgps
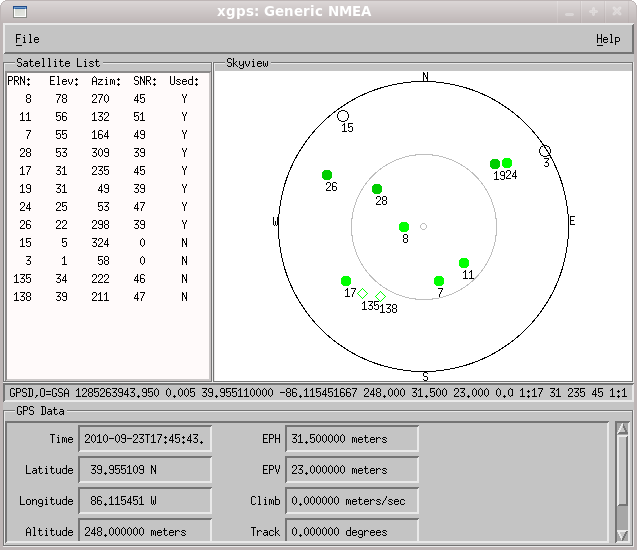
You can use the xgps command to bring up a graphical interface to the gpsd service. Running:
[root@cayenne ~]# xgps &
[root@cayenne ~]#
The xgps utility shows a lot of the information provided by the gpsd service. For example, in the image below, you can see what satellites were used by the GPS in forming a solution and the current location of the GPS.
