Console Output and Serial Terminals
Overview
This page describes different methods for setting up a serial console post booting up an NST system. See Getting Started - Server Boot for setting up a serial console initially during a NST Live boot.
Serial Console On NST 2.13.0
Add Serial Console On Device: /dev/ttyS0
Use the following command to manually enable the serial console on NST versions 2.13.0 using upstart. This example will set the serial baud rate to: "57600" and use serial device: "/dev/ttyS0".
[root@probe ~]#
A user login prompt should now be active on serial device: "/dev/ttyS0".
Serial Console On NST 2.15.0 or Above
Add A Serial Console On Device: /dev/ttyS0
![]() See the topic: "Enabling systemctl Bash Completion" for making it quick and easy to complete the systemctl command.
See the topic: "Enabling systemctl Bash Completion" for making it quick and easy to complete the systemctl command.
Use the following command to manually enable the serial console on NST versions 2.15.x or above using systemd. This example will use the current baud rate (agetty -s option) set typically during a boot time and use serial device: "/dev/ttyS0". If one needs to adjust the baud rate, send a break character on your communications application to cycle through the baud rate list (i.e., In this example: 115200, 38400 and 9600).
[root@probe ~]#
A user login prompt should now be active on serial device: "/dev/ttyS0". To get the serial console status use the systemctl command as follows:
serial-getty@ttyS0.service - Serial Getty on ttyS0
          Loaded: loaded (/lib/systemd/system/serial-getty@.service)
          Active: active (running) since Tue, 17 May 2011 16:59:56 -0400; 5min ago
        Main PID: 31524 (agetty)
          CGroup: name=systemd:/system/serial-getty@.service/ttyS0
                  └ 31524 /sbin/agetty -s ttyS0 115200 38400 9600
[root@probe ~]#
Add An Additional Serial Login Device: /dev/ttyUSB0
One can add an additional Serial user login session on a serial device. If your NST system does not have a physical serial port, you can plugin a USB To Serial Converter device for user login. In this example we are adding a USB To Serial Converter which attaches as device: "ttyUSB0". Simply start a serial login on this device as follows:
[root@probe ~]#
A user login prompt should now be active on serial device: "/dev/ttyUSB0". To get the serial console status for this device use the systemctl command as follows:
serial-getty@ttyUSB0.service - Serial Getty on ttyUSB0
	  Loaded: loaded (/lib/systemd/system/serial-getty@.service)
	  Active: active (running) since Fri, 20 May 2011 21:13:55 -0400; 3min 24s ago
	Main PID: 1273 (agetty)
	  CGroup: name=systemd:/system/serial-getty@.service/ttyUSB0
		  └ 1273 /sbin/agetty -s ttyUSB0 115200 38400 9600
[root@probe ~]#
To make this configuration permanent add the following:
[root@probe ~]#
Steps To Add A Custom Serial Login Device: "/dev/ttyS1"
Use the following procedure to add a custom serial login device under systemd control. In this example we will add the ability for user login on the second serial device: "/dev/ttyS1" using a fixed baud rate of 57600 and 8-bits clean with no flow control.
1. Get a copy of "/lib/systemd/system/serial-getty@.service" and place it in directory: "/etc/systemd/system" and give it a custom name (e.g., "serial-getty-fterm@.service").
total 32
drwxr-xr-x. 7 root root 4096 May 22 20:30 .
drwxr-xr-x. 4 root root 4096 May 15 19:22 ..
lrwxrwxrwx  1 root root   36 May 16 09:26 default.target -> /lib/systemd/system/runlevel5.target
drwxr-xr-x. 2 root root 4096 May 15 19:13 default.target.wants
drwxr-xr-x. 2 root root 4096 May 22 20:26 getty.target.wants
drwxr-xr-x. 2 root root 4096 May 15 19:26 graphical.target.wants
drwxr-xr-x. 2 root root 4096 May 16 09:26 multi-user.target.wants
-rw-r--r--  1 root root  903 May 22 16:36 serial-getty-fterm@.service
drwxr-xr-x. 2 root root 4096 May 15 19:13 sysinit.target.wants
[root@probe ~]#
2. Edit custom file: "/etc/systemd/system/serial-getty-fterm@.service" and set the fixed baud rate of 57600 on the "ExecStart" line.
#  This file is part of systemd.
#
#  systemd is free software; you can redistribute it and/or modify it
#  under the terms of the GNU General Public License as published by
#  the Free Software Foundation; either version 2 of the License, or
#  (at your option) any later version.

[Unit]
Description=Serial Getty on %I
BindTo=dev-%i.device
After=dev-%i.device systemd-user-sessions.service plymouth-quit-wait.service
After=rc-local.service

# If additional gettys are spawned during boot then we should make
# sure that this is synchronized before getty.target, even though
# getty.target didn't actually pull it in.
Before=getty.target

[Service]
Environment=TERM=vt100
ExecStart=-/sbin/agetty %I 57600
Restart=always
RestartSec=0
UtmpIdentifier=%I
KillMode=process

# Some login implementations ignore SIGTERM, so we send SIGHUP
# instead, to ensure that login terminates cleanly.
KillSignal=SIGHUP
3. Create a symbol link in directory: "/etc/systemd/system" using serial device: "/dev/ttyS1" to custom file: "/etc/systemd/system/serial-getty-fterm@.service". This will make the configuration permanent across reboots.
drwxr-xr-x. 2 root root 4096 May 22 20:26 .
drwxr-xr-x. 7 root root 4096 May 22 20:25 ..
lrwxrwxrwx. 1 root root   34 May 15 19:13 getty@tty1.service -> /lib/systemd/system/getty@.service
lrwxrwxrwx. 1 root root   34 May 15 19:13 getty@tty2.service -> /lib/systemd/system/getty@.service
lrwxrwxrwx. 1 root root   34 May 15 19:13 getty@tty3.service -> /lib/systemd/system/getty@.service
lrwxrwxrwx. 1 root root   34 May 15 19:13 getty@tty4.service -> /lib/systemd/system/getty@.service
lrwxrwxrwx. 1 root root   34 May 15 19:13 getty@tty5.service -> /lib/systemd/system/getty@.service
lrwxrwxrwx. 1 root root   34 May 15 19:13 getty@tty6.service -> /lib/systemd/system/getty@.service
lrwxrwxrwx  1 root root   47 May 22 20:26 serial-getty-fterm@ttyS1.service -> /etc/systemd/system/serial-getty-fterm@.service
lrwxrwxrwx  1 root root   41 May 20 21:12 serial-getty@ttyUSB0.service -> /lib/systemd/system/serial-getty@.service
[root@probe ~]#
4. Manually control systemd using systemctl to startup the login service via agetty on device: "/dev/ttyS1". systemd will do this automatically during the boot process.
[root@probe ~]#
5. Check the current service status for serial login on device: "/dev/ttyS1"
serial-getty@ttyS1.service - Serial Getty on ttyS1
	  Loaded: loaded (/etc/systemd/system/serial-getty-fterm@.service)
	  Active: active (running) since Sun, 22 May 2011 20:09:39 -0400; 8s ago
	Main PID: 6408 (agetty)
	  CGroup: name=systemd:/system/serial-getty-fterm@.service/ttyS1
		  └ 6408 /sbin/agetty ttyS1 57600
[root@probe ~]#
Serial Console: VMware Workstation
This section will describe the steps needed to attach serial device to an NST Virtual Machine (VM) under VMware Workstation (v7.1.x) control for serial console output. This will allow one to examine the complete boot sequence via the serial console output including boot strapping the Linux Kernel. See the article: Using the VMware Workstation emulated serial port on a Linux host for advanced usage (i.e., Howto setup a Linux Kernel serial debugger) of the serial console under VMware Workstation control. In this example we will add a Unix Socket connection serial type and use the nc (netcat) utility for attachment to the socket (I/O) in a Gnome Terminal.
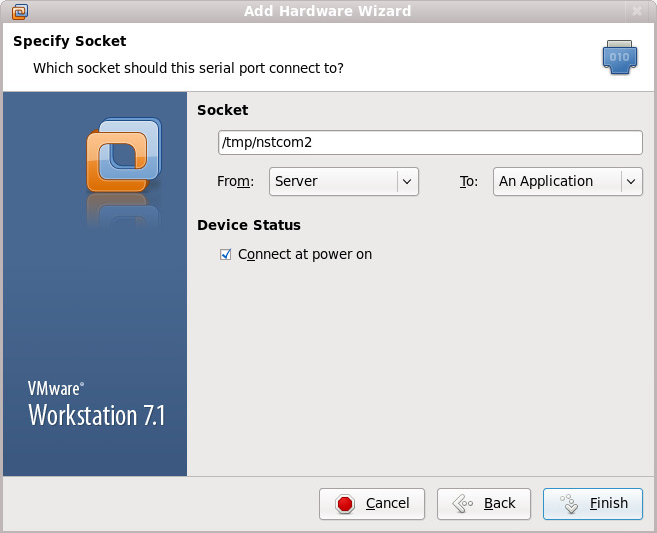
1. To add a serial port to an NST VM, using the following menu sequence on VMware Workstation: VM => Settings => Add => Serial Port => Next => Output to socket. In our example we are adding the "Serial Port 2" device with Unix socket name: "/tmp/nstcom2". See the screenshots below:

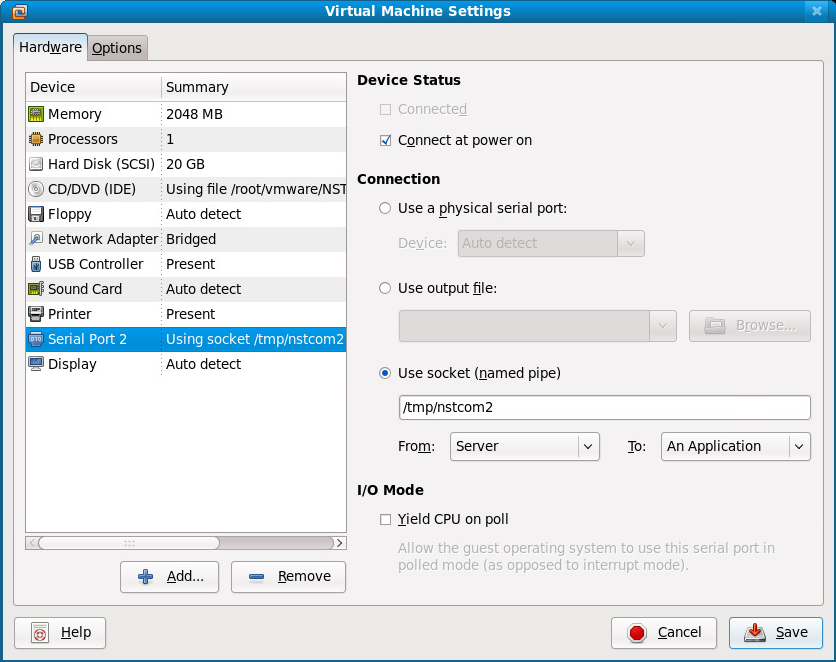
The serial port setting for VMware Workstation after adding the "Serial Port 2" device with Unix socket name: "/tmp/nstcom2" will be shown as:
