HowTo Geolocate kismet Data: Difference between revisions
(Created page with '= Kismet Prerequisites = = Locating the Kismet NST WUI Page = center|frame|Locating the kismet service in the NST WUI = Kismet Configura…') |
|||
| (20 intermediate revisions by 2 users not shown) | |||
| Line 1: | Line 1: | ||
= Kismet Prerequisites = | = Kismet Prerequisites = | ||
== Supported Wireless Card(s) == | |||
As a general rule of thumb, most WIFI adapters based on a Aetheros or Intel chip set should work "out of the box" when setting up [http://www.kismetwireless.net Kismet] on a NST system. To get an idea of the chip set used by your WIFI adapter, you can use the '''lspci''' command. The example output shown below is from running '''lspci''' on a ASUS Eeee PC and tells us that the system is using a Aetheros based chip set: | |||
[root@cayenne trunk]# lspci | |||
... Removed output for non-WIFI related hardware ... | |||
02:00.0 Network controller: Atheros Communications Inc. AR9285 Wireless Network Adapter (PCI-Express) (rev 01) | |||
[root@cayenne trunk]# | |||
[http://www.kismetwireless.net Kismet] requires one or more WIFI adapters. The '''lspci''' command is useful at displaying what WIFI hardware is present on your system. However, the '''lspci''' output does not tell you whether the necessary drivers for the hardware are installed on the system. The '''iwconfig''' command will tell you what WIFI adapters are supported by the system. For example, the following shows that my system has one WIFI adapter (''wlan0''): | |||
[root@cayenne trunk]# iwconfig | |||
lo no wireless extensions. | |||
eth0 no wireless extensions. | |||
wlan0 IEEE 802.11bgn ESSID:"WRT610N-SHOP0" | |||
Mode:Managed Frequency:2.437 GHz Access Point: 68:7F:74:03:3F:00 | |||
Bit Rate=65 Mb/s Tx-Power=20 dBm | |||
Retry long limit:7 RTS thr:off Fragment thr:off | |||
Encryption key:off | |||
Power Management:off | |||
Link Quality=50/70 Signal level=-60 dBm | |||
Rx invalid nwid:0 Rx invalid crypt:0 Rx invalid frag:0 | |||
Tx excessive retries:0 Invalid misc:0 Missed beacon:0 | |||
[root@cayenne trunk]# | |||
If your WIFI adapter is not recognized by the system, you may want to refer the [http://www.kismetwireless.net/ Kismet site] for more information and links. You might find information on how to download and install the necessary drivers for your your hardware. | |||
== GPS Device and '''gpsd''' Service == | |||
If you would like to be able to display the information collected by Kismet in Google Earth, you will need to connect a compatible GPS to your NST system and run the '''gpsd''' service. Refer to: "[[HowTo Setup The NST System With A GPS (gpsd)]]" for details on connecting a GPS to your NST system. | |||
= Locating the Kismet NST WUI Page = | = Locating the Kismet NST WUI Page = | ||
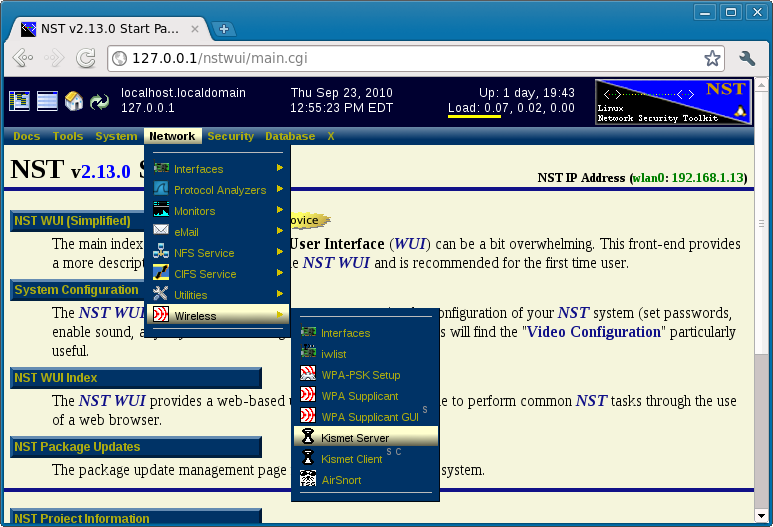
The following shows how you locate the Kismet server administrative page using the NST WUI: | |||
[[File:kismet-server-menu-select.png|center|frame|Locating the kismet service in the NST WUI]] | [[File:kismet-server-menu-select.png|center|frame|Locating the kismet service in the NST WUI]] | ||
= Kismet Configuration = | = Kismet Setup and Configuration = | ||
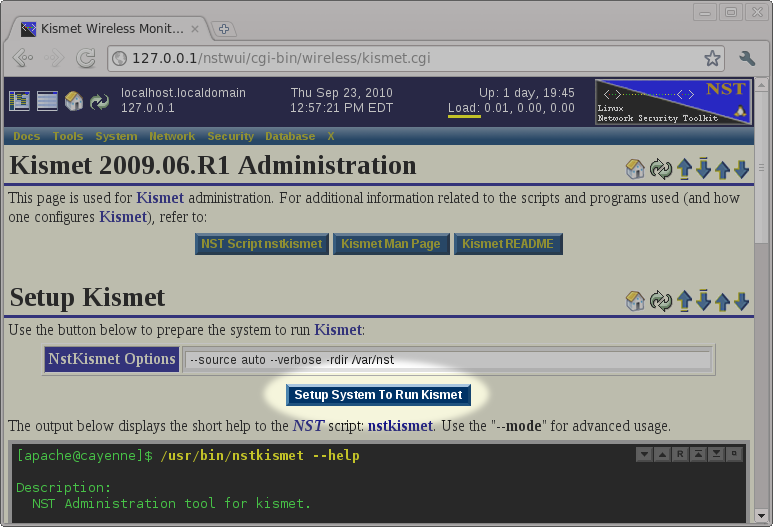
The '''NST''' ships with the necessary tools to setup and configure the system to run the '''kismet''' service. However, you must prepare and configure your system before you will be able to run the '''kismet''' service. The '''nstkismet''' script is used to prepare the system and you can run it simply by pressing the ''Setup System To Run Kismet'' button found on the ''Kismet Administration'' page. The default options shown in the image below should be sufficient for most systems. | |||
[[File:kismet-setup.png|center|frame|Setting up the NST system to run kismet using the NST WUI]] | [[File:kismet-setup.png|center|frame|Setting up the NST system to run kismet using the NST WUI]] | ||
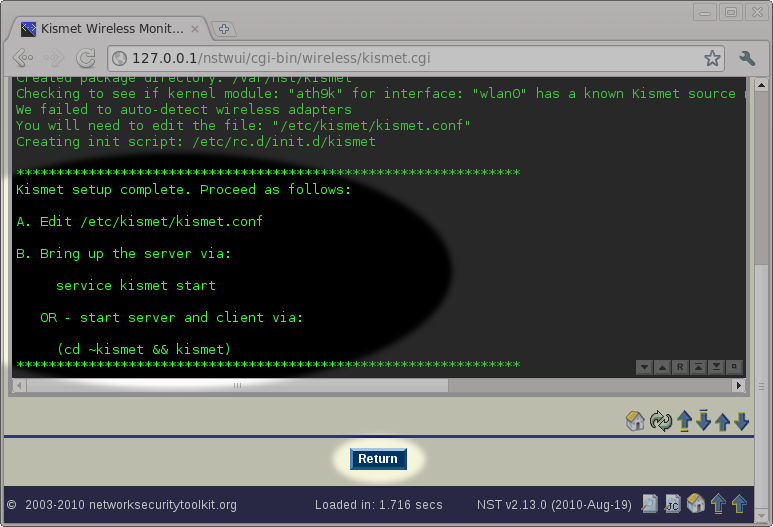
[[File:kismet-setup-complete.png|center|frame|Results from setting up kismet using the | After pressing the ''Setup System To Run Kismet'' button, you will be taken to a page showing the results of running the '''nstkismet''' script. The output will indicate whether your wireless card was auto-detected or not. It will also tell you that you should review/edit the ''/etc/kismet/kismet.conf'' file and then start the ''kismet'' service. We will do these two steps using the '''NST WUI'''. For now, we simply need to press the ''Return'' button near the bottom of the page. | ||
[[File:kismet-setup-complete.png|center|frame|Results from setting up kismet using the NST WUI]] | |||
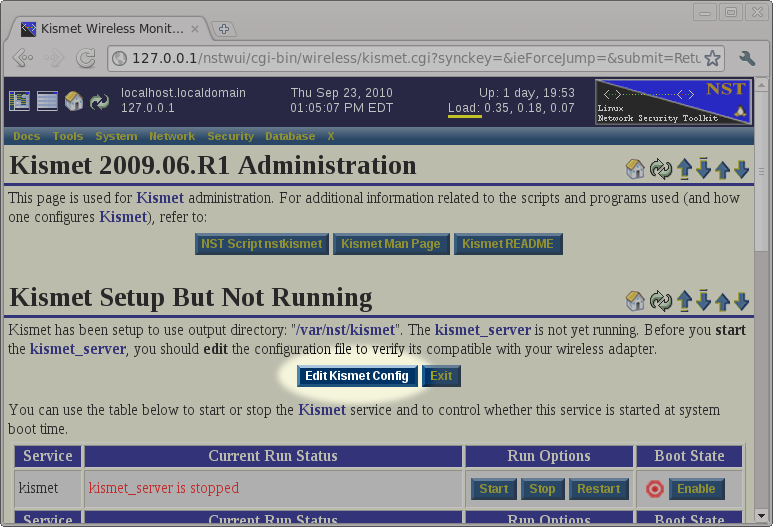
After returning to the ''Kismet Administration'' page, we will set that the system has been setup to run the '''kismet''' service, but that the service is not currently running. Before starting the service, we will use the ''Edit Kismet Config'' button to review and possibly change the default configuration. | |||
'''***Note:''' If you are not familiar with Kismet, you should use the ''Kismet README'' and ''Kismet Man Page'' buttons to read up on using Kismet before continuing. | |||
[[File:kismet-edit-start.png|center|frame|Editing the kismet configuration file using the NST WUI]] | [[File:kismet-edit-start.png|center|frame|Editing the kismet configuration file using the NST WUI]] | ||
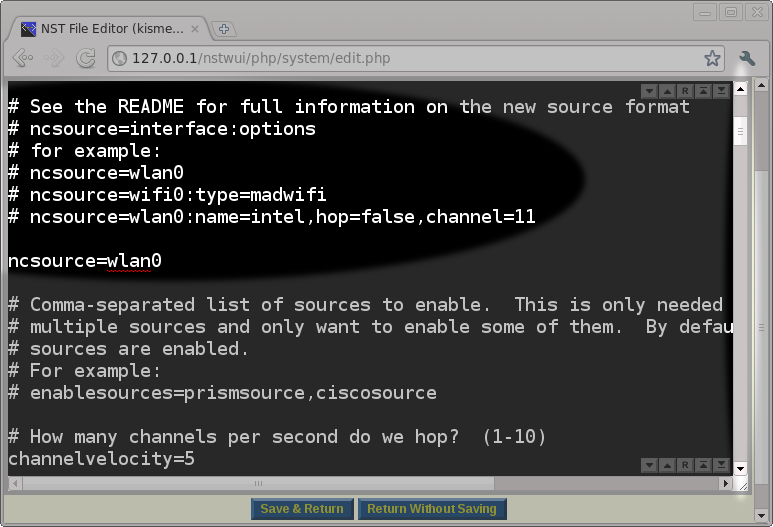
[[File:kismet-edit-source.png|center|frame|Editing the kismet | There are a lot of options that can be set in the ''/etc/kismet/kismet.conf'' file. The default values for most of the settings will work. However, you must set the ''ncsource'' parameter correctly for your system. After reviewing the Kismet README file (Use the: ''Kismet README'' button), we determined that we would start out by setting the ''ncsource'' parameter to our wireless interface ''wlan0'' and omit all of the optional ''ncsource'' settings as a starting point. We can always come back later if we decide to tweak the ''ncsource'' options shown in the Kismet README. | ||
[[File:kismet-edit-source.png|center|frame|Editing the kismet ncsource interface(s) using the NST WUI]] | |||
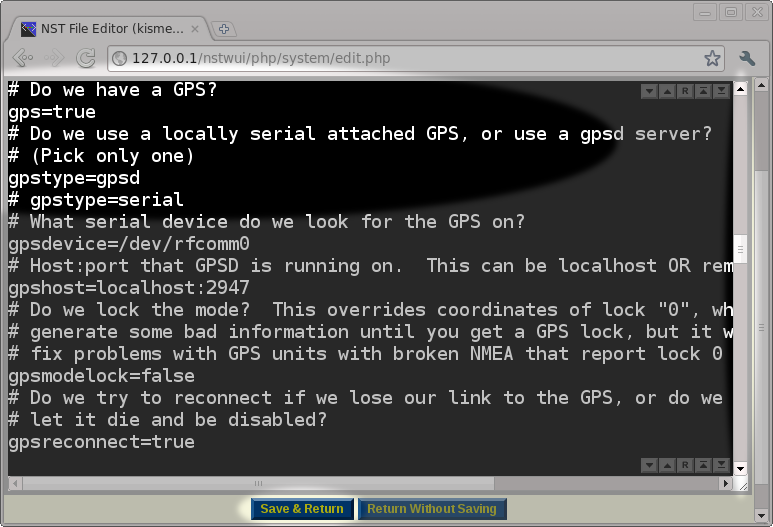
After setting the ''ncsource'' parameter in the configuration file, we scrolled down to the GPS area to make sure that the GPS was enabled and configured to use the '''gpsd''' service running on the ''localhost'' (127.0.0.1). We chose this GPS configuration because we have already setup the '''NST''' system to run the '''gpsd''' service by following the directions in: "[[HowTo Setup The NST System With A GPS (gpsd)]]". After verifying the GPS settings as being correct, we will press the ''Save & Return'' button to save our edits and return to the ''Kismet Administration'' page. | |||
[[File:kismet-edit-gps.png|center|frame|Editing the kismet GPS configuration using the NST WUI]] | [[File:kismet-edit-gps.png|center|frame|Editing the kismet GPS configuration using the NST WUI]] | ||
= Kismet Start | = Starting The Kismet Service = | ||
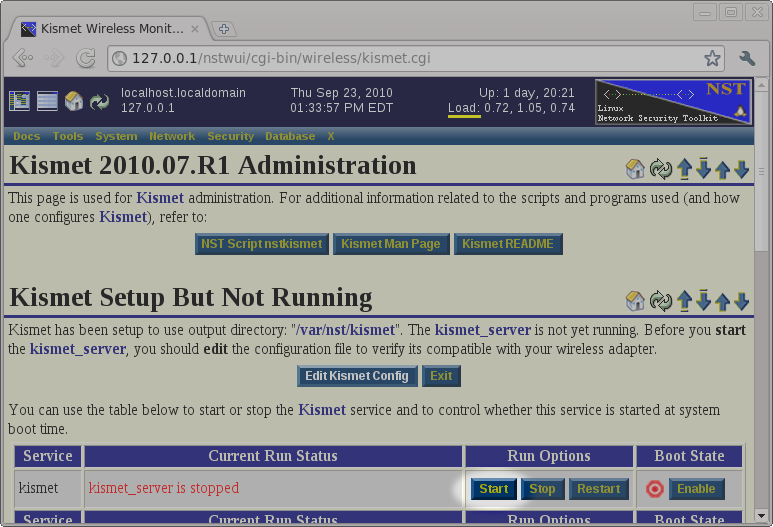
Now that we've prepared the system to run the '''kismet''' service, we will unplug the laptop and carry it and the attached GPS to the car. Once inside the car, we will verify that the GPS has determined its position and then start the '''kismet''' service by pressing the ''Start'' button on the ''Kismet Administration'' page shown below. | |||
[[File:kismet-start.png|center|frame|Starting the kismet service using the NST WUI]] | [[File:kismet-start.png|center|frame|Starting the kismet service using the NST WUI]] | ||
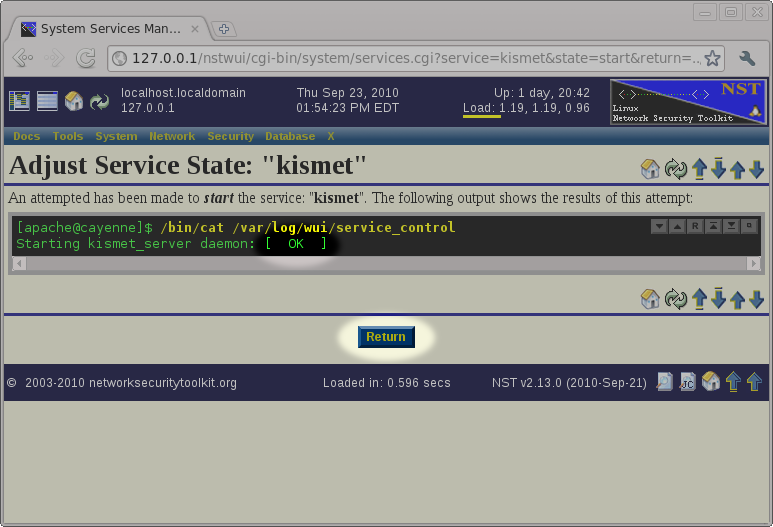
After pressing the ''Start'' button, we should see that the '''kismet_server''' daemon started ''OK'' (if not, we will need to edit the configuration and try again). After verifying that the '''kismet_server''' daemon started, we can press the ''Return'' button to return back to the ''Kismet Administration'' page. | |||
[[File:kismet-started.png|center|frame|Results from starting the kismet service in the NST WUI]] | [[File:kismet-started.png|center|frame|Results from starting the kismet service in the NST WUI]] | ||
= Drive Around = | |||
At this point we can simply start driving and allow Kismet to do its thing. Here are some thoughts and theories on how to improve location accuracy (don't take them too seriously as the author is not a Kismet expert). | |||
* Try to keep your antennae elevated. My assumption is that a antennae placed in the passenger seat will almost always have a line of site that passes through the metal skin of the car and that signal readings will be better if you can raise the antennae such that it is at mid window level. | |||
* Driving slowly will give Kismet more time to channel hop and discover access points. | |||
* Driving in non-straight lines may help in locating the access point on the proper side of the street. The theory being that if you drive in a straight line, the signal strength would appear the same to Kismet regardless of which side of the street the access point is located on. | |||
= Kismet Results = | |||
In this experiment, we drove through a local shopping center with the purpose of locating stores offering WIFI access. After completing the drive, it's time to examine the data collected by Kismet. | |||
== Stopping The Kismet Service == | |||
Before examining the collected data, we will stop the '''kismet_server''' daemon. | |||
* This will stop Kismet from collecting any more data. | |||
* This will force Kismet to write out its result files. | |||
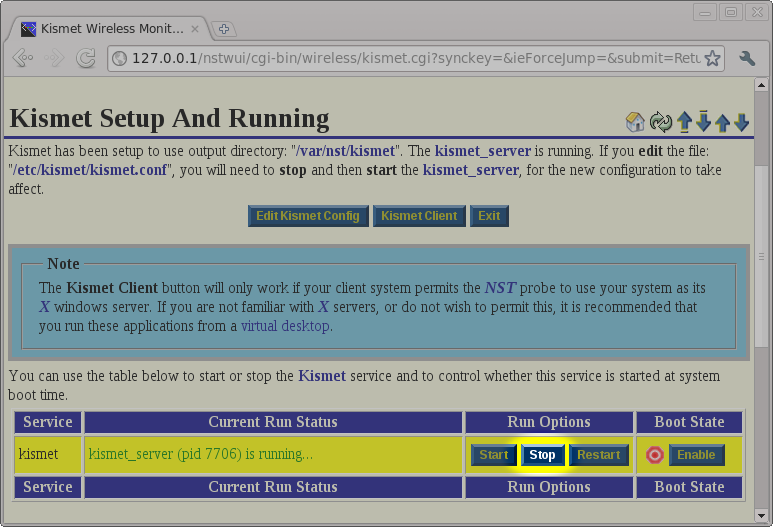
To stop the '''kismet_server''' daemon, we will use the ''Stop'' button on the ''Kismet Administration'' page. | |||
[[File:kismet-stop.png|center|frame|Stopping the kismet service using the NST WUI]] | [[File:kismet-stop.png|center|frame|Stopping the kismet service using the NST WUI]] | ||
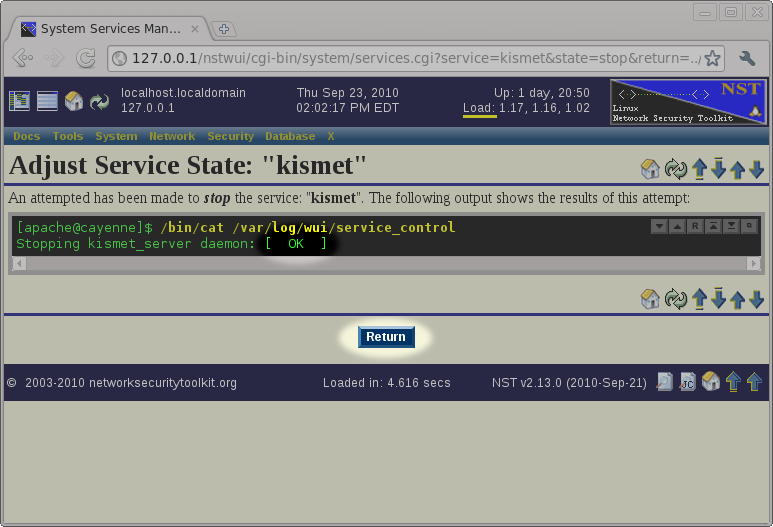
After stopping the '''kismet_server''' daemon, we will use the ''Return'' button to return to the ''Kismet Administration'' page. | |||
= Kismet Results = | [[File:kismet-stopped.png|center|frame|Results from stopping the kismet service in the NST WUI]] | ||
== The Kismet Results Table == | |||
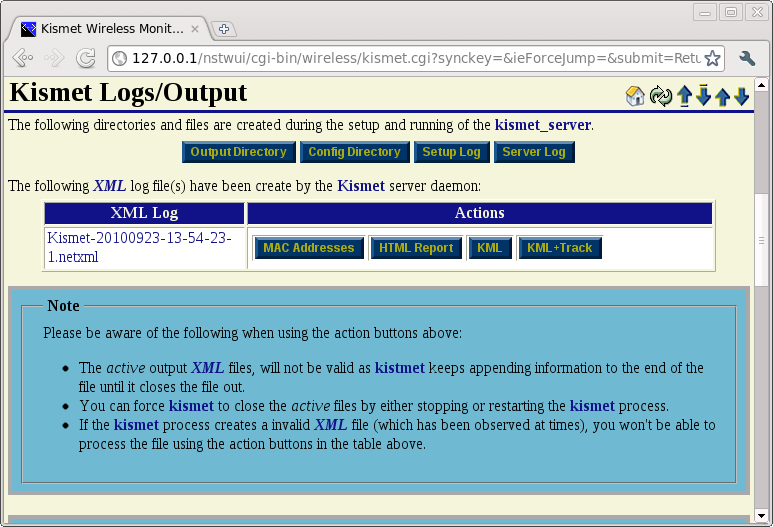
After stopping the '''kismet_server''' daemon and returning to the ''Kismet Administration'' page, we will scroll down to the ''Kismet Logs/Ouput'' page to view the results. | |||
[[File:kismet-results.png|center|frame|Results produced by the kismet service]] | [[File:kismet-results.png|center|frame|Results produced by the kismet service]] | ||
=== MAC Addresses === | |||
The ''MAC Addresses'' report is a very simple output showing a list of unique MAC addresses sorted alphabetically. It is not useful for our purpose of identifying stores offering free WIFI. While this report is not useful for our current purpose, it can be useful in the following scenario: | |||
* You configure Kismet not to channel hop, but instead to monitor only the frequency/channel used by your WIFI access point. | |||
* You keep your Kismet system stationary (to monitor only your own access point). | |||
* You determine the expected MAC addresses in your network configuration. | |||
* You periodically generate the ''MAC Address'' report. | |||
* You compare the current ''MAC Address'' report with the expected set of MAC addresses to see if there is any unexpected or new equipment entering your network. | |||
00:02:2D:28:73:6F | |||
00:8A:29:BF:7D:10 | |||
00:02:2D:BF:7D:10 | |||
D0:B0:3C:BF:7D:10 | |||
00:02:2D:BF:7D:10 | |||
00:66:00:00:00:00 | |||
00:02:2D:BF:7D:10 | |||
00:02:2D:BF:7D:10 | |||
00:02:2D:BF:7D:10 | |||
0B:1C:6B:3A:38:11 | |||
00:02:2D:BF:7D:10 | |||
00:02:2D:BF:7D:10 | |||
00:02:2D:BF:7D:10 | |||
00:02:2D:2A:60:6F | |||
98:02:2D:28:73:6F | |||
00:02:2D:BF:7D:10 | |||
32:C6:2C:BF:32:9D | |||
00:02:2D:BF:7D:10 | |||
=== HTML Table === | |||
The ''HTML Report'' button provides table based details of the WIFI access points and clients detected by Kismet. Near the top of the page you will find a ''Network Summary'' listing the networks discovered by Kismet. You can click on links in the ''BSSID'' column to jump to the details for a particular network. | |||
[[File:kismet-html-summary.png|center|frame|The summary area at the top of the HTML report generated from kismet data]] | |||
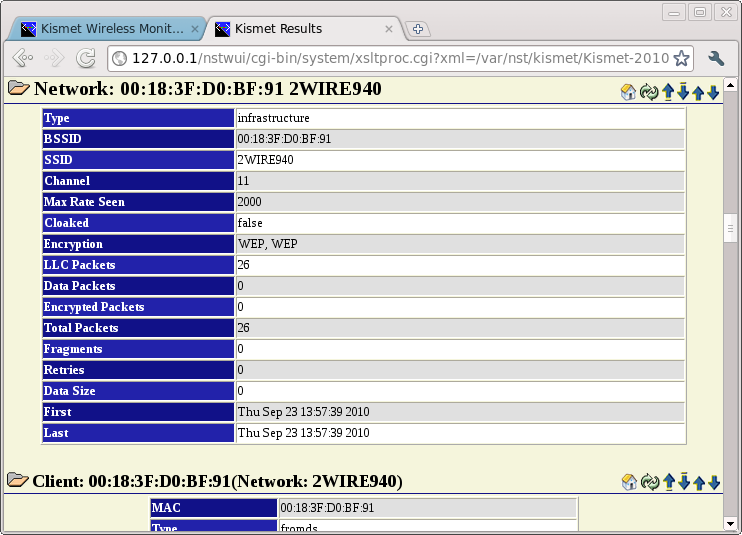
When viewing the detailed results for a particular network, you will see a ''Network'' summary table followed by zero or more ''Client'' entries. The folder icons next to the headers can be used to collapse or expand the detailed information for the entire network or individual clients. | |||
[[File:kismet-html-network.png|center|frame|The details for a particular network and its clients from the HTML report generated from kismet data]] | |||
=== KML (Google Earth) === | |||
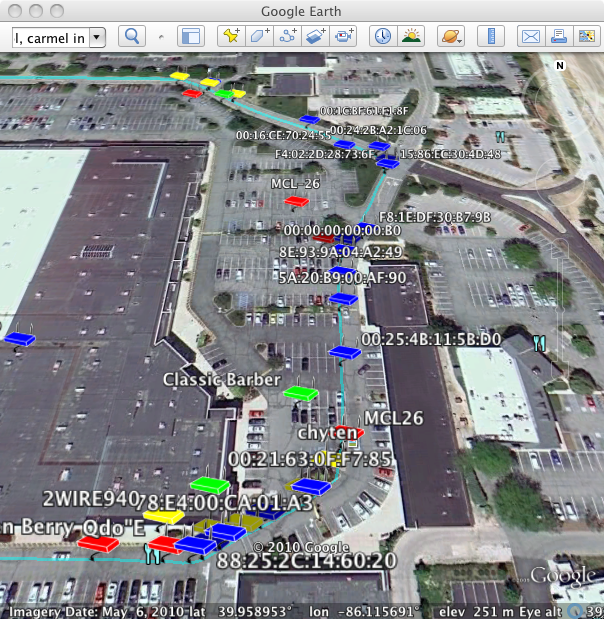
The ''KML'' and ''KML+Track'' reports are very similar and generate output that can be opened and viewed using ''Google Earth''. The only difference between the two reports is that the ''KML+Track'' report includes a cyan line showing the route driven. The image below shows the ''KML+Track'' report displayed in Google Earth. We've zoomed into the shopping area we drove through and we see that there were a lot of systems using WIFI. | |||
[[File:kismet-google-earth.png|center|frame|Results produced by the kismet service displayed using Google Earth]] | |||
There are a lot of icons shown on the map. We are really only interested in the ''red'' ones at this point as they represent the open (unsecure) WIFI networks within the shopping center. We will remove the check mark on the box labeled ''Secure Networks'' to show only the ''Unsecure Networks''. | |||
[[File:kismet-google-earth-open.png|center|frame|Displaying only the open WIFI networks in Google Earth]] | |||
At this point, the map gives us a good idea of what stores offer WIFI. The information doesn't necessarily mean that WIFI access is free or automatic. This can only be determined by connecting to the network. However, it does give us a hint that if our Internet connection goes out at home, we might want to try eating at: | |||
* Qdoba | |||
* Panera | |||
* MCL | |||
* Yogen Berry | |||
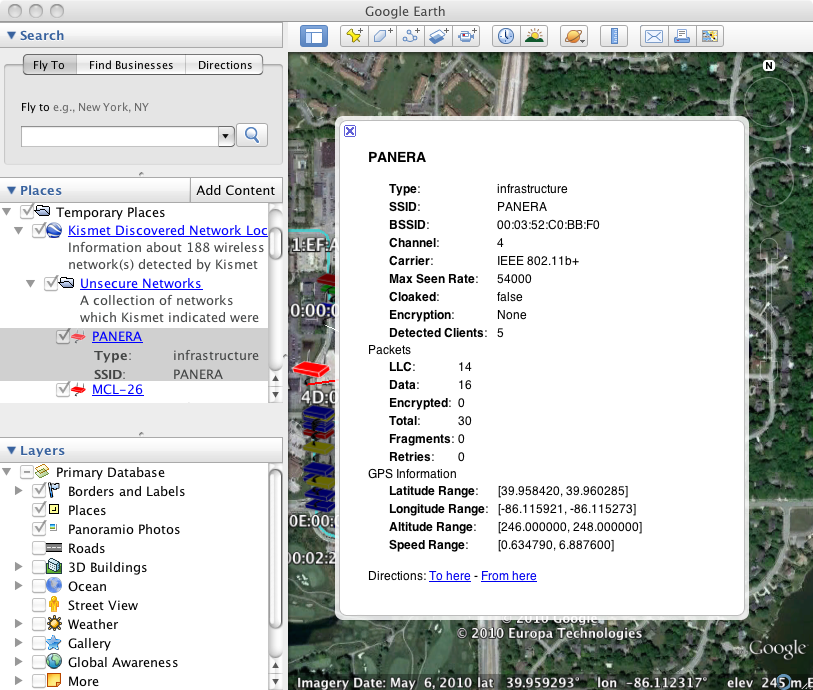
If you want additional details on a particular icon displayed on map, you can simply click on the icon to pull up a ''information balloon''. For example, by clicking on the ''PANERA'' access point, we see the following: | |||
[[File:kismet-google-earth-details.png|center|frame|Detailed results for the PANERA network produced by the kismet service displayed using Google Earth]] | |||
==== KMZ Update (2010-Oct-27) ==== | |||
If your NST system has been updated after 2010-Oct-27, you will no longer have the option to download a raw KML file. Instead, the NST system will generate a KMZ output file which contains the KML file along with supporting resource files. This new KMZ file is still viewable in Google Earth. | |||
In addition to the change to the KMZ format, there have been some enhancements to the rendering: | |||
* Systems which Kismet classifies as wireless networks (infrastructure) are in a separate folder from those Kismet was unable to classify. | |||
* Open wireless networks are in a separate folder. | |||
* Weak encryption networks are in their own folder. | |||
* Networks using strong or other encryption methods are in their own folder. | |||
* Detected clients are now plotted with lines linking them back to the network Kismet thinks they belong to. These client systems are not shown by default. To see them, you will need to open up the folder containing the network in question and select the check box on the ''Clients'' folder below. | |||
* Clicking on icons or links in the side bar provides a ''prettier'' rendering of the information and links back to the NST system. | |||
The following image shows how the side bar navigation can be used to show the clients connected to the PANERA network: | |||
[[File:kismet-google-earth-clients.png|thumb|622px|center|Clients connected to the PANERA network in the 2010-Oct-27 NST update]] | |||
You can download the KMZ file above at: | |||
http://wiki.networksecuritytoolkit.org/nstwiki/maps/kismet-2010-10-27.kmz | |||
Latest revision as of 10:40, 29 October 2010
Kismet Prerequisites
Supported Wireless Card(s)
As a general rule of thumb, most WIFI adapters based on a Aetheros or Intel chip set should work "out of the box" when setting up Kismet on a NST system. To get an idea of the chip set used by your WIFI adapter, you can use the lspci command. The example output shown below is from running lspci on a ASUS Eeee PC and tells us that the system is using a Aetheros based chip set:
[root@cayenne trunk]# lspci
... Removed output for non-WIFI related hardware ...
02:00.0 Network controller: Atheros Communications Inc. AR9285 Wireless Network Adapter (PCI-Express) (rev 01)
[root@cayenne trunk]#
Kismet requires one or more WIFI adapters. The lspci command is useful at displaying what WIFI hardware is present on your system. However, the lspci output does not tell you whether the necessary drivers for the hardware are installed on the system. The iwconfig command will tell you what WIFI adapters are supported by the system. For example, the following shows that my system has one WIFI adapter (wlan0):
[root@cayenne trunk]# iwconfig
lo        no wireless extensions.

eth0      no wireless extensions.

wlan0     IEEE 802.11bgn  ESSID:"WRT610N-SHOP0"
          Mode:Managed  Frequency:2.437 GHz  Access Point: 68:7F:74:03:3F:00
          Bit Rate=65 Mb/s   Tx-Power=20 dBm
          Retry  long limit:7   RTS thr:off   Fragment thr:off
          Encryption key:off
          Power Management:off
          Link Quality=50/70  Signal level=-60 dBm
          Rx invalid nwid:0  Rx invalid crypt:0  Rx invalid frag:0
          Tx excessive retries:0  Invalid misc:0   Missed beacon:0

[root@cayenne trunk]#
If your WIFI adapter is not recognized by the system, you may want to refer the Kismet site for more information and links. You might find information on how to download and install the necessary drivers for your your hardware.
GPS Device and gpsd Service
If you would like to be able to display the information collected by Kismet in Google Earth, you will need to connect a compatible GPS to your NST system and run the gpsd service. Refer to: "HowTo Setup The NST System With A GPS (gpsd)" for details on connecting a GPS to your NST system.
Locating the Kismet NST WUI Page
The following shows how you locate the Kismet server administrative page using the NST WUI:
Kismet Setup and Configuration
The NST ships with the necessary tools to setup and configure the system to run the kismet service. However, you must prepare and configure your system before you will be able to run the kismet service. The nstkismet script is used to prepare the system and you can run it simply by pressing the Setup System To Run Kismet button found on the Kismet Administration page. The default options shown in the image below should be sufficient for most systems.
After pressing the Setup System To Run Kismet button, you will be taken to a page showing the results of running the nstkismet script. The output will indicate whether your wireless card was auto-detected or not. It will also tell you that you should review/edit the /etc/kismet/kismet.conf file and then start the kismet service. We will do these two steps using the NST WUI. For now, we simply need to press the Return button near the bottom of the page.
After returning to the Kismet Administration page, we will set that the system has been setup to run the kismet service, but that the service is not currently running. Before starting the service, we will use the Edit Kismet Config button to review and possibly change the default configuration.
***Note: If you are not familiar with Kismet, you should use the Kismet README and Kismet Man Page buttons to read up on using Kismet before continuing.
There are a lot of options that can be set in the /etc/kismet/kismet.conf file. The default values for most of the settings will work. However, you must set the ncsource parameter correctly for your system. After reviewing the Kismet README file (Use the: Kismet README button), we determined that we would start out by setting the ncsource parameter to our wireless interface wlan0 and omit all of the optional ncsource settings as a starting point. We can always come back later if we decide to tweak the ncsource options shown in the Kismet README.
After setting the ncsource parameter in the configuration file, we scrolled down to the GPS area to make sure that the GPS was enabled and configured to use the gpsd service running on the localhost (127.0.0.1). We chose this GPS configuration because we have already setup the NST system to run the gpsd service by following the directions in: "HowTo Setup The NST System With A GPS (gpsd)". After verifying the GPS settings as being correct, we will press the Save & Return button to save our edits and return to the Kismet Administration page.
Starting The Kismet Service
Now that we've prepared the system to run the kismet service, we will unplug the laptop and carry it and the attached GPS to the car. Once inside the car, we will verify that the GPS has determined its position and then start the kismet service by pressing the Start button on the Kismet Administration page shown below.
After pressing the Start button, we should see that the kismet_server daemon started OK (if not, we will need to edit the configuration and try again). After verifying that the kismet_server daemon started, we can press the Return button to return back to the Kismet Administration page.
Drive Around
At this point we can simply start driving and allow Kismet to do its thing. Here are some thoughts and theories on how to improve location accuracy (don't take them too seriously as the author is not a Kismet expert).
- Try to keep your antennae elevated. My assumption is that a antennae placed in the passenger seat will almost always have a line of site that passes through the metal skin of the car and that signal readings will be better if you can raise the antennae such that it is at mid window level.
- Driving slowly will give Kismet more time to channel hop and discover access points.
- Driving in non-straight lines may help in locating the access point on the proper side of the street. The theory being that if you drive in a straight line, the signal strength would appear the same to Kismet regardless of which side of the street the access point is located on.
Kismet Results
In this experiment, we drove through a local shopping center with the purpose of locating stores offering WIFI access. After completing the drive, it's time to examine the data collected by Kismet.
Stopping The Kismet Service
Before examining the collected data, we will stop the kismet_server daemon.
- This will stop Kismet from collecting any more data.
- This will force Kismet to write out its result files.
To stop the kismet_server daemon, we will use the Stop button on the Kismet Administration page.
After stopping the kismet_server daemon, we will use the Return button to return to the Kismet Administration page.
The Kismet Results Table
After stopping the kismet_server daemon and returning to the Kismet Administration page, we will scroll down to the Kismet Logs/Ouput page to view the results.
MAC Addresses
The MAC Addresses report is a very simple output showing a list of unique MAC addresses sorted alphabetically. It is not useful for our purpose of identifying stores offering free WIFI. While this report is not useful for our current purpose, it can be useful in the following scenario:
- You configure Kismet not to channel hop, but instead to monitor only the frequency/channel used by your WIFI access point.
- You keep your Kismet system stationary (to monitor only your own access point).
- You determine the expected MAC addresses in your network configuration.
- You periodically generate the MAC Address report.
- You compare the current MAC Address report with the expected set of MAC addresses to see if there is any unexpected or new equipment entering your network.
00:02:2D:28:73:6F
00:8A:29:BF:7D:10
00:02:2D:BF:7D:10
D0:B0:3C:BF:7D:10
00:02:2D:BF:7D:10
00:66:00:00:00:00
00:02:2D:BF:7D:10
00:02:2D:BF:7D:10
00:02:2D:BF:7D:10
0B:1C:6B:3A:38:11
00:02:2D:BF:7D:10
00:02:2D:BF:7D:10
00:02:2D:BF:7D:10
00:02:2D:2A:60:6F
98:02:2D:28:73:6F
00:02:2D:BF:7D:10
32:C6:2C:BF:32:9D
00:02:2D:BF:7D:10
HTML Table
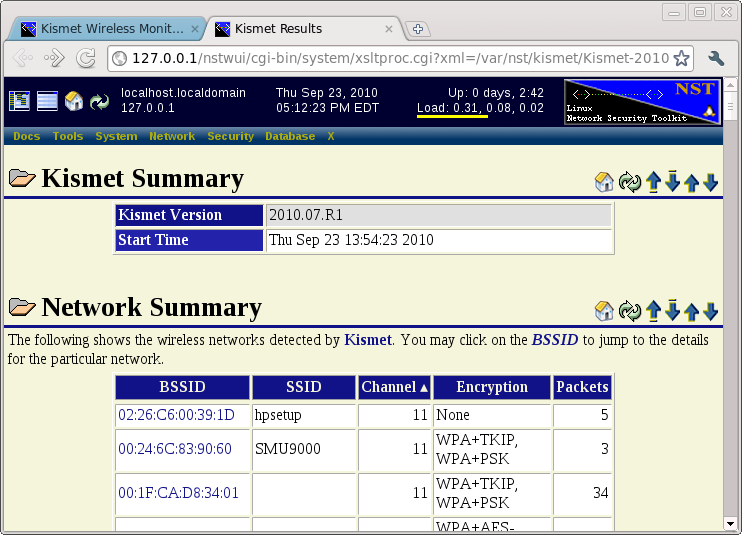
The HTML Report button provides table based details of the WIFI access points and clients detected by Kismet. Near the top of the page you will find a Network Summary listing the networks discovered by Kismet. You can click on links in the BSSID column to jump to the details for a particular network.
When viewing the detailed results for a particular network, you will see a Network summary table followed by zero or more Client entries. The folder icons next to the headers can be used to collapse or expand the detailed information for the entire network or individual clients.
KML (Google Earth)
The KML and KML+Track reports are very similar and generate output that can be opened and viewed using Google Earth. The only difference between the two reports is that the KML+Track report includes a cyan line showing the route driven. The image below shows the KML+Track report displayed in Google Earth. We've zoomed into the shopping area we drove through and we see that there were a lot of systems using WIFI.
There are a lot of icons shown on the map. We are really only interested in the red ones at this point as they represent the open (unsecure) WIFI networks within the shopping center. We will remove the check mark on the box labeled Secure Networks to show only the Unsecure Networks.
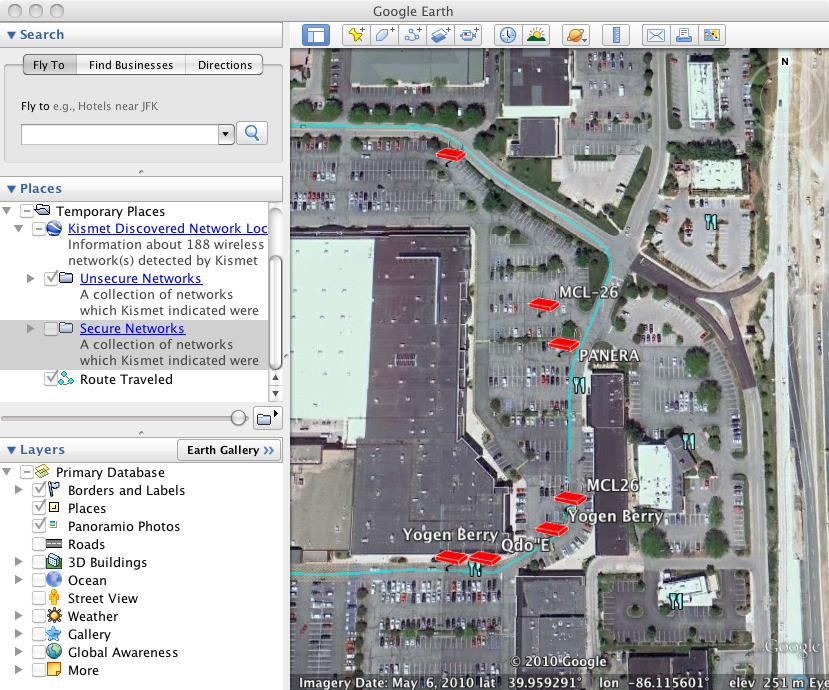
At this point, the map gives us a good idea of what stores offer WIFI. The information doesn't necessarily mean that WIFI access is free or automatic. This can only be determined by connecting to the network. However, it does give us a hint that if our Internet connection goes out at home, we might want to try eating at:
- Qdoba
- Panera
- MCL
- Yogen Berry
If you want additional details on a particular icon displayed on map, you can simply click on the icon to pull up a information balloon. For example, by clicking on the PANERA access point, we see the following:
KMZ Update (2010-Oct-27)
If your NST system has been updated after 2010-Oct-27, you will no longer have the option to download a raw KML file. Instead, the NST system will generate a KMZ output file which contains the KML file along with supporting resource files. This new KMZ file is still viewable in Google Earth.
In addition to the change to the KMZ format, there have been some enhancements to the rendering:
- Systems which Kismet classifies as wireless networks (infrastructure) are in a separate folder from those Kismet was unable to classify.
- Open wireless networks are in a separate folder.
- Weak encryption networks are in their own folder.
- Networks using strong or other encryption methods are in their own folder.
- Detected clients are now plotted with lines linking them back to the network Kismet thinks they belong to. These client systems are not shown by default. To see them, you will need to open up the folder containing the network in question and select the check box on the Clients folder below.
- Clicking on icons or links in the side bar provides a prettier rendering of the information and links back to the NST system.
The following image shows how the side bar navigation can be used to show the clients connected to the PANERA network:
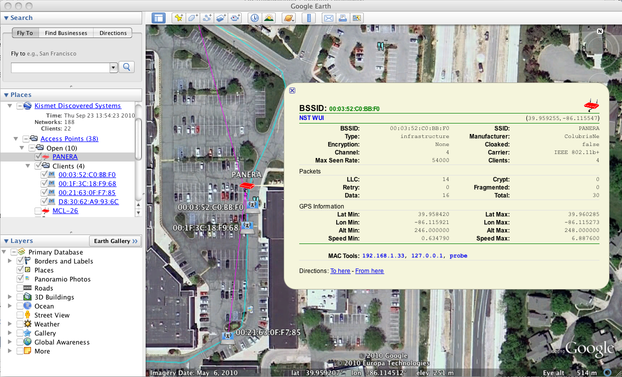
You can download the KMZ file above at:
http://wiki.networksecuritytoolkit.org/nstwiki/maps/kismet-2010-10-27.kmz